Helium Streamer goes free

As of the latest version of Helium Streamer (3.3, released today) there will be a free version and a Premium version just like for Helium.

We want everyone to be able to get remote access to their music and we’re glad to finally release an entry-level version of Helium Streamer for free.

The limitations in the free version of Helium Streamer follows the same pattern as in Helium. Here is a short list of what is locked in the free version:

  • Labels view
  • Genres view
  • Years view
  • Statistics view
  • Changing thumbnail sizes (the Free version comes with the “small” thumbnail size)
  • Managing users (the Free version only allows for one user. If you have Helium Premium you can manage users from there, which will work also in the Streamer)
  • Multiple database support (the Free version comes with the default SQL Server Compact database). If you use a different database in Helium, it will work in Helium Streamer also, but you cannot create SQL Server or MySql/MariaDb from Helium Streamer free.
  • Remote access for the mobile apps for iOS and Android. If you want to connect the Helium Streamer app for iOS or Android to Helium Streamer you need a Premium license of Helium Streamer.

Click here to download the free version of Helium Streamer 3.3!

News in Helium Streamer 3.3

So, apart from the awesome news about a free version of Helium Streamer, what’s new since last release?

One big focus with this release has been to move towards multi-platform support. The ultimate goal is to make Helium Streamer available on Linux and macOS apart from Windows. Even though we’re not yet there we have made significant progress. Let us know what you think about this in the comments.

Helium Streamer comes with a couple of new features in this release. Here are the most important news:

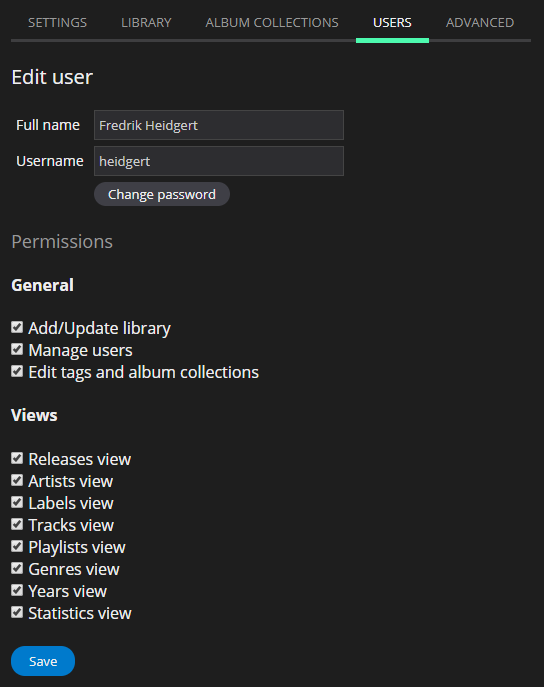
User permissions (Premium version only)

Helium Streamer now uses the same permission system as Helium does. The permissions set on a user in Helium is used in Helium Streamer and vice versa. Not all permissions makes sense to support in Helium Streamer, but most does. You can edit permissions for a user from the Settings page.

2017-11-09_2054_001

Album collection management

It was previously possible to filter for album collections in Helium Streamer but you could only use album collections set from Helium. It is now possible to add and remove collections from an album, as well as create, edit and delete album collections (available from Settings).


Multiple thumbnail sizes (Premium version only)

It is now possible to switch to medium or small sized thumbnails from Settings. Small thumbnails will be the new default. The free version can only show small thumbnails.

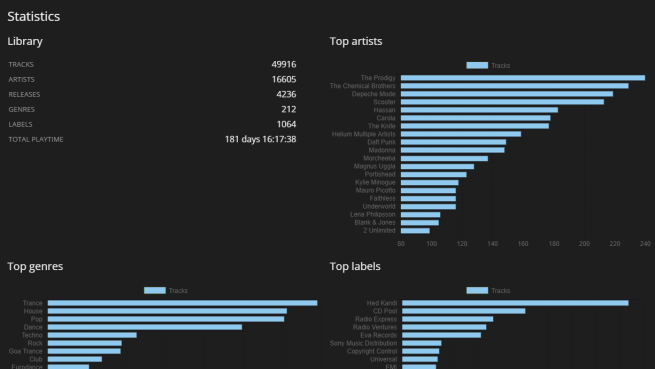
New statistics view (Premium version only)

The all-new statistics view will let you get a better understanding of your music library. Many of the popular statistics from Helium have now been incorporated into Helium Streamer.

2017-11-09_2055

Click here to download the free version of Helium Streamer 3.3!

We would very much like to hear your thoughts about this new free version of Helium Streamer. Do you like it? Do you miss any important features? Does the free version have enough unlocked content? Let us know in the comments!

Tidy up your file names

Helium has always offered good tools and options to rename files based on tags. Helium 12 will continue on this path but we have taken a different approach this time.

In order to create a new or modify an existing rename template in Helium Music Manager (version 11 and back) you needed to go into and out of a lot of dialogs. This may have helped some users since it’s a somewhat guided experience, but we also think it might have confused some since it deviated from what other apps were doing (and are still doing).

We decided to take on a similar approach as others, at least for the moment. We can always build on what we have if it turns out that our users were more comfortable with the old solution, although we do believe this new rename tool will satisfy old as well as new users, whether you have or have not used a similar feature before.

So, what have changed? Everything really.

Instead of a lot of user interface getting in the way, you will write your templates by hand. Creating a template that previously took minutes will now take seconds, as long as you are able to grasp how the template syntax works. This will be explained below. Lucky you!

If you have used a “tag to filename” or a similar tool in another application, or if you have used the “Filename to tag” feature in Helium Music Manager you will feel right at home.

Lesson 1 (the basics)

Say you want your filenames to look something like this:

David Bowie – Lazarus.mp3

Easy. Just type in this template and hit Go (or “Rename files” as the button is really named):

{{artist}} - {{title}}

What’s that around the artist and title names you ask? Curly brackets of course. Why do we need to use two opening and two closing all the time you ask? You’ll see.

Lesson 2 (prefixes and suffixes)

Say you want to include a little more information in the names such as a “Remix” field and a “Subtitle” field. Easy, you say. Looks like this:

{{artist}} - {{title}} ({{subtitle}}) [{{remix}}]

Of course. But what about files that don’t have any subtitle or remix tags set? That would end up with something like this:

David Bowie – Lazarus () [].mp3

You don’t want that. This is where the concept of prefix and suffix comes in. Prefix is something that is included before a field and suffix is included after the field. Look at this template:

{{artist}} - {{title}}{ ({subtitle})}{ [{remix}]}

As you can see we have included a prefix and suffix in between the curly brackets. This will make the field disappear entirely (including the prefix and suffix) from the file name if the field is empty in tags.

As you see you can use a combination of literal text (like the ” – ” between artist and title) and prefix/suffix. Literals work fine as long as you are sure that the fields before and after will always contain something. Use what fit your needs.

Lesson 3 (folders)

Creating folders based on tag information is important to any serious music collector. You can enter folders into your templates by adding backslashes to specify new folders. If you would want to move songs into artists’ folders like this:

David Bowie\Lazarus.mp3

You type in a template like this:

{{artist}}\{{title}}

Note that this would create an artist folder wherever the file was previously located which may not be what you expect. To tell Helium 12 exactly where you would like your files to end up you will need to explicitly include the path in your template, like this:

C:\My music\{{artist}}\{{title}}

Lesson 4 (numbers)

Numbers can be included just as any other field in a template. Just wrap the field between two curly brackets as usual:

{{track}}. {{title}}

which produces this file name:

3. Lazarus.mp3

Sometimes you might want to pad numbers with leading zeros, perhaps to make them line up neat in the lists. Would that be hard? You know it won’t. Example ahead:

{{track(2)}}. {{title}}

Insert round brackets after the field name and enter the number of numbers (no pun intended) you want your filenames to have. The above template would produce:

03. Lazarus.mp3

While

{{track(5)}}. {{title}}

would produce

00003. Lazarus.mp3

Lesson 5 (limit lengths)

If you want to limit the length of some fields you can do this in a similar fashion to how number padding works. Say you would want to create a file structure like this:

C:\My music\D\David Bowie\Blackstar\03. Lazarus.mp3

Your template would look like this:

C:\My music\{{artist(1)}}\{{artist}}\{{album}}\{{track(2)}}. {{title}}

As you see you include a limitor between round brackets. The 1 says that the artist field should be limited to a maximum of one character.

Lesson 6 (replacement for empty tags)

As mentioned earlier, an empty field will always be stripped from the filename along with the prefix and suffix. Sometimes you want this but sometimes you would want to include a placeholder to keep consistency in file names or folders. Consider the following file structure:

C:\My music\Album\2016\David Bowie – Blackstar\3. Lazarus.mp3

The following template would work as long as the “Release type” field contains some information:

C:\My music\{{releasetype}}\{{releaseyear}}\{{artist}} - {{album}}\{{track}}. {{title}}

But what if you run across a couple of files that does not have any value in the “Release type” field? These files would end up here:

C:\My music\2015\Basement Jaxx – Awesomeness (Bootleg)\5. Best. Song. Ever.mp3

See the missing release type folder? This can be solved using this syntax:

{{field|Replacement text}}

i.e. a pipe character after the field name followed by the text that should replace an empty field. The following template would fix the issue with folders ending up in the wrong place:

C:\My music\{{releasetype|Unknown}}\{{releaseyear}}\{{artist}} - {{album}}\{{track}}. {{title}}

Which would place the Basement Jaxx tune from above in this folder instead:

C:\My music\Unknown\2015\Basement Jaxx – Awesomeness (Bootleg)\5. Best. Song. Ever.mp3

Complete list of fields

Below is a list of all supported fields that will come in next release:

{{bitrate}}
{{encodingtype}}
{{frequency}}
{{album}}
{{albumartist}}
{{artist-so}}
{{album-so}}
{{albumsubtitle}}
{{artist}}
{{artist-so}}
{{bandorchestra}}
{{bpm}}
{{comment}}
{{composer}}
{{conductor}}
{{copyright}}
{{cd}}
{{track}}
{{custom1}}
{{custom2}}
{{custom3}}
{{custom4}}
{{custom5}}
{{custom6}}
{{custom7}}
{{custom8}}
{{custom9}}
{{custom10}}
{{encodedby}}
{{genre}}
{{initialkey}}
{{isrc}}
{{label}}
{{language}}
{{lyricist}}
{{media}}
{{mood}}
{{originalartist}}
{{originallyricist}}
{{originaltitle}}
{{preference}}
{{produced}}
{{rating}}
{{recordingyear}}
{{releaseyear}}
{{remix}}
{{situation}}
{{softwaresettings}}
{{subtitle}}
{{tempo}}
{{title}}
{{title-so}}
{{totalcds}}
{{totaltracks}}

End of story (for now)

We hope all of this makes sense and that it will speed up your work flow.

Have any suggestions to add? Missing a certain field? Let us know in the comments.
Preview of new UI

Since the middle of May 2015 we have been focusing on creating a new user interface (UI). The new UI is planned to follow the same pattern as in Helium Music Manager 11 where there is a Music Explorer, an Album view, an Artist view etc. What we don’t plan on implementing separately is the Music Browser (aka the MiB). The current plan is to take the best out of the Music Browser and merge into the other views (e.g. album and artist).

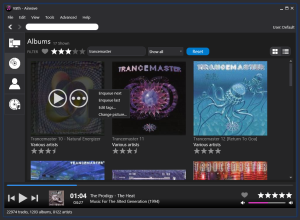
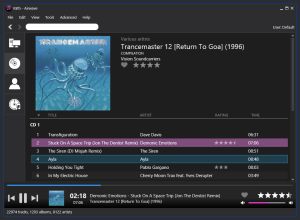
We are thrilled to finally be able to present some screenshots showing the Album view and the simple album details pages from both Helium and Helium Streamer.

Please note that this is a very early preview with only a few features implemented. There will be changes along the way.

Helium (album view and album page)

vath1 vath2

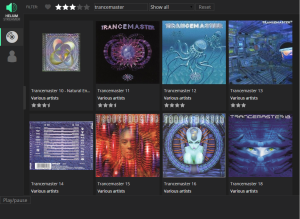
Helium Streamer  (album view and album page)

streamer1 streamer2

As you can see, both products follow the same design and flow (apart from some inconsistencies that we will iron out) to help you easily switch between Helium and Helium Streamer while maintaining the most common and useful features. This also allows us to re-use good solutions and to avoid reinventing the wheel.

One of our main goals has been a more responsive and quicker application in combination with displaying the most useful meta-data up front.

So, how does this connect to what you can see in the screenshots?

To start with, the user interface in Helium is now fully scalable and is using hardware accelerated graphics when rendered. This means that Helium will automatically understand your active DPI settings – if you have set Windows to use larger fonts, the same scaling will automatically be applied to Helium.

What we have done next is to apply a dark theme, something which has been requested by many users. We also plan to create a light theme.

Just below the main menu you will find a navigation bar which allows back and next navigation as well as a global search.

For the Album, Artist and Label view we are testing a new concept – each of the views supports 4 times larger thumbnails, which is presented in a thumbnail flow to be able to give you a richer graphical user experience and using your meta data smarter.

Despite the increased thumbnail size, performance is much better than in Helium 11.

Per default all albums, artists and labels are shown. To quickly find one or more specific items you can now use the top filter. At the moment we support filtering of favorites, rating, free-text (album name or album artist) and release type. As soon as you change any of the filters the results will be immediately be shown which is a huge improvement compared to how it works in Helium 11 where each filter requires a full refresh. For example if you type “goa” in the free-text filter, all results matching goa will be shown instantly. If you then change the rating filter, the result will be narrowed down.

We are also experimenting with two different view modes for these views, the thumbnail view as shown in the screenshots and a card view. The card-view still shows an album image, but a little smaller one with more information about the album to the right of the image.

The information shown to the right follows a template which you can design, just like in Helium 11 today. You can easily toggle between these modes with the buttons to the right.

To simplify which commands that can apply to a specific item (album, artist, label) we have implemented a special state when hovering an item. For an album you will see two buttons, one play button which will play the album and one more button (…) which will show you a context menu with commands related to the specific item. These commands can for example be Enqueue next, Add to playlist, Edit tags, Download information and more.

The text under each album will show the name of the album, the album artist, rating and whether it’s a favourite item or not. The album artist label is in fact a hyperlink which allows you to click on the name to quickly navigate to the artist detail page. When you double-click on an album you will be taken to the album details page which will show various details about the album as well the full track list.

The track list will be grouped per CD if it is a multiple CD album. From the track list you can double click an track to play it as well as execute various commands from its context menu. The artist name for each track is also linked so that you quickly can navigate to a specific artists details directly from the track list.

You can toggle between simple (default) and advanced view mode from the View menu. When you enable advanced mode, more album details will be shown (defined via a template) as well as a more traditional track list for the album.

This track list works much like the track list in Helium today, allowing you to quickly show/hide columns, change the order of columns and more. What it also will allow you is to group the items in one or more levels with drag and drop, as well as quickly filter out items on one or more columns.

This summarizes this post about the new UI, with main focus on the Albums view.

During our next posts we will dig deeper into the Artist view and artist details as well as present the new Add to database dialog.